This tutorial covers the post installation basic configuration of Monowall (M0n0wall). This segment covers changing the default password, setting the time zone of the firewall. It also covers setting static IP address mappings via DHCP as well as configuring port forwarding. This is the second part in a series of tutorials which will range from basic configuration of the firewall to more advanced topics such as IPSEC tunnels and VPN clients.
Log into the firewall
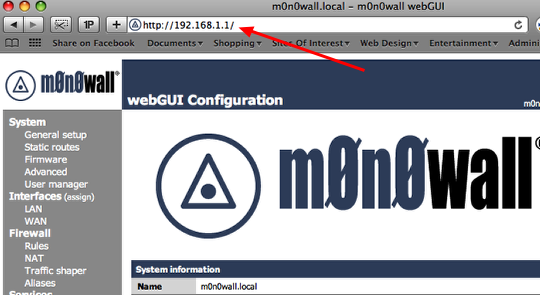
Open a web browser and log in to the firewall. The default address is
http://192.168.1.1. The username is:
admin and the default password is:
mono
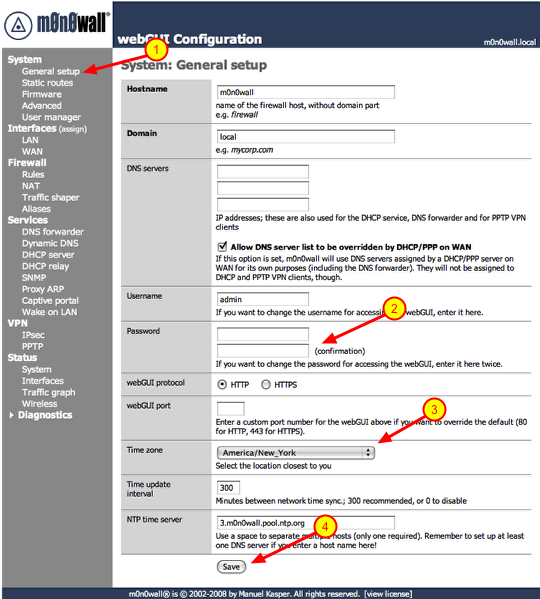
Change password & time zone
1.) Click on ‘General Setup’ under ‘System’
2.) Type in a new password in both boxes. As a general rule of thumb you should you upper and lowercase characters as well as symbols.
3.) Select the time zone you are in.
4.) Click the ‘Save’ button.
After you click save the firewall will prompt you to log back in with the new password.
Open the DHCP server configuration page
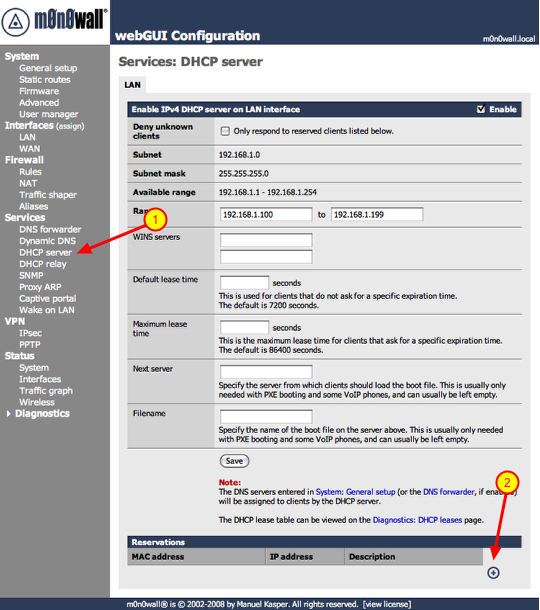
If you are going to access any devices on your local network via the Internet you need assign them static IP addresses. This is important if you’re going to log into your workstation remotely via a service like ‘Back To My Mac’, connect to a SlingBox remotely or play video games via a PC, Xbox360 or a PS3. This will become clear when we start configuring Port ‘Forwarding’. So let’s get started on assigning IP addresses to these devices. For this example we are going to assign a static IP to the workstation connected to the firewall. We will need to know the MAC address of the device, this is the physical address of the network interface. On some devices you will see a sticker which states the MAC address of the device, on others you will have to go into a configuration or information screen to gather that information. The MAC address will be in the following format ##:##:##:##:##:##, it will be a combination of numerals and characters. On a Mac you would click on the Apple logo on the menu-bar, go to ‘About This Mac’, ‘More Info..” and click on ‘Network’. You will see the different available network interfaces, click on the network interface in question and you will see the MAC address of the interface. So now that you have the needed information, lets proceed.
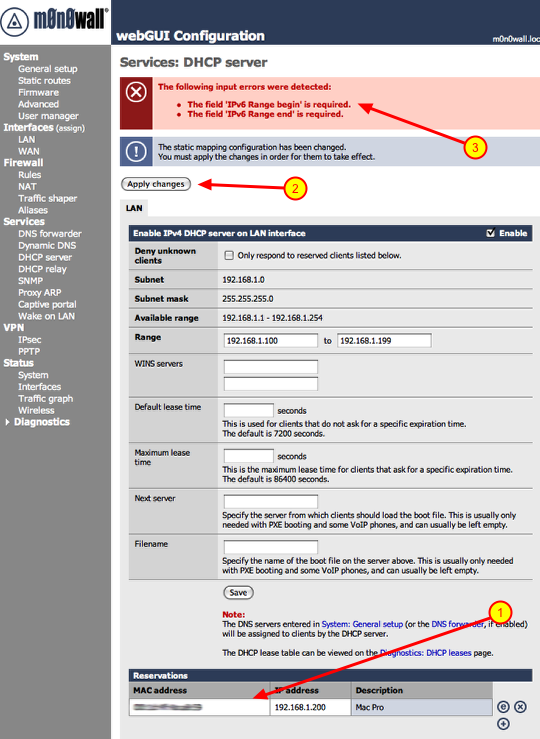
Also the static IPs have to be outside the range of IPs given out by the DHCP server. The default range is 100 – 199, keep that in mind.
1.) Click ‘DHCP server’ under the ‘Services’ section
2.) Click the ‘+’ symbol under the ‘Reservations’ section
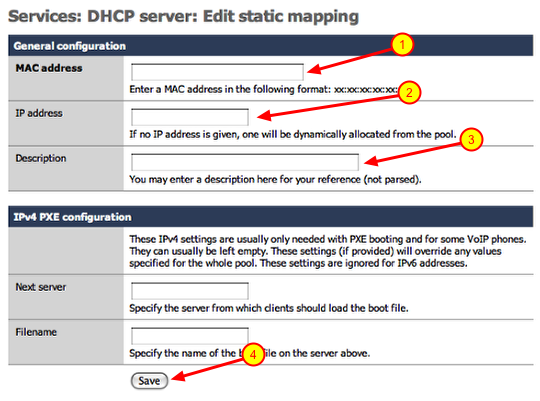
Add static IP address mapping
1.) Enter the MAC address of the device you are adding
2.) Enter the IP address you would like to assign to the device. (i.e.. 192.168.1.200) Make sure the IP address falls within the range of your local network.
3.) Enter a description for the device you are adding a static mapping to and click save.
Repeat these steps for every device you need to add. Once you are done continue to the next section.
Apply changes, beware of the bugs though
1.) You will notice your new reservations listed below.
2.) Click the ‘Apply changes’ button.
3.) If you are installing 1.3 version you will see the above error. This is a bug in that version, it will be fixed in the next revision.
**If you do get this error after clicking ‘Apply changes’, you need to reboot the firewall. To do that click ‘Reboot system’ under the ‘Diagnostics’ section. Once you do that the changes will take affect.
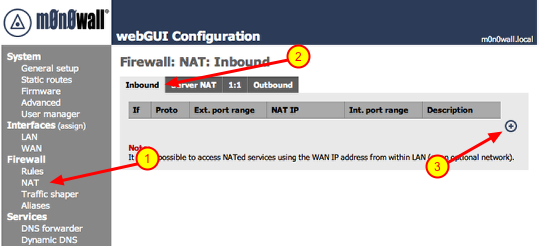
Port forwarding
1.) Click on ‘NAT’ under Firewall
2.) Make sure ‘Inbound’ is selected
3.) Click the ‘+’ symbol
Adding port forwarding rule
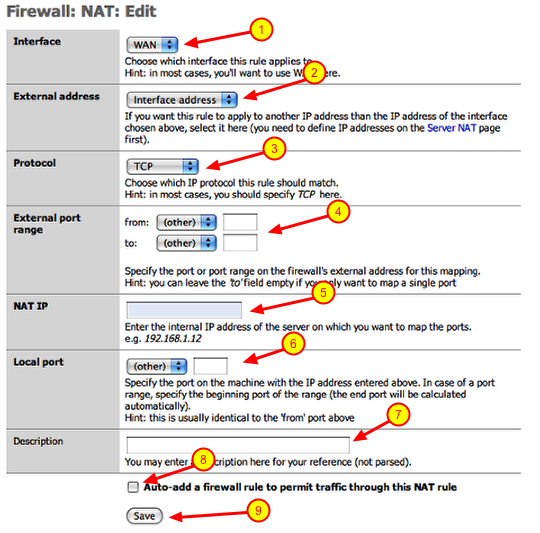
I am going to create a port forwarding rule as if I had a SlingBox on my local network. SlingBox uses TCP port 5001 to communicate with the Internet. So I am going to configure a rule that states and traffic coming in on the WAN port (Internet interface) on TCP port 5001 be forwarded to an IP address on my local network. These are the steps to achieve that:
1.) Interface: should point to WAN
2.) External address: should point to ‘interface address’
3.) Protocol: select the appropriate protocol from the drop down (i.e.. TCP)
4.) External port range: enter the port number in both boxes (i.e.. 5001)
5.) NAT IP: this would be the IP address of the device on your local network (i.e.. 192.168.1.200)
6.) Local port: this would be the same port number used in step 4 (i.e.. 5001)
7.) Description: enter a thorough description of the device and port number you are forwarding for future reference
8.) Click the checkbox: This will automatically create the firewall rule you will need at the same time.
9.) Click the ‘Save’ button
Repeat these steps if you have multiple ports you have to open for a device. Also repeat these steps if you have multiple devices to add.
Apply changes
Once you are finished adding all of you port forwards, you can click on the ‘Apply changes’ button and you are done
Ports for forwarding common devices
Xbox360 Live: UDP/TCP 3074
PS3: TCP 5223, UDP 3478. UDP 3479, UDP 3658 **Certain games may require additional port forward mappings, check with game vendor
SlingBox: TCP 5001
If you need information on ports for device not listed here, check with the manufacturers support web page. If you cannot find it there try Googling: firewall port forwarding for (then add your device and then hit the ‘Search’ button)
Finished
We are done with this segment of the tutorial. In the next installment we will discuss Dynamic DNS services and VPN Tunnels (IPsec Mobile, PPTP).

 This utility is somewhat similar to a utility called DockView which allows you to see previews of open applications in the dock. All you have to do is mouse over the open application and a bubble will appear displaying an image of each window open of that particular application. You can also view calendar events within the bubble and also control iTunes within the preview window as well.
 This adds additional functionality to the Finder by allowing you to open new finder windows as tabs rather than separate windows. It also allows you to view the tabs side by side which is great for looking for duplicates or moving files between folders. There are a slew of other features you can download a demo from their site and try it for 14 days to see if it fits your needs.
 I often connect other workstations at my home using screen sharing. This little utility adds a drop-down menu which will show you all the workstations that you can share the screen of. This cuts down the steps needed to find the workstation and start a screen sharing session.
 I have been using a utility called LaunchBar for quite some time now. LaunchBar lets you do various tasks via the keyboard, such as running applications or searching for files along with a slew of other tasks. Alfred is very similar to LaunchBar but much more polished in my opinion. It is free for the base product which can be downloaded via their website or via the Apple App Store. The real gem to this product is the optional PowerPack you can purchase which even adds more functionality as well as extensions that can be downloaded and added to Alfred.